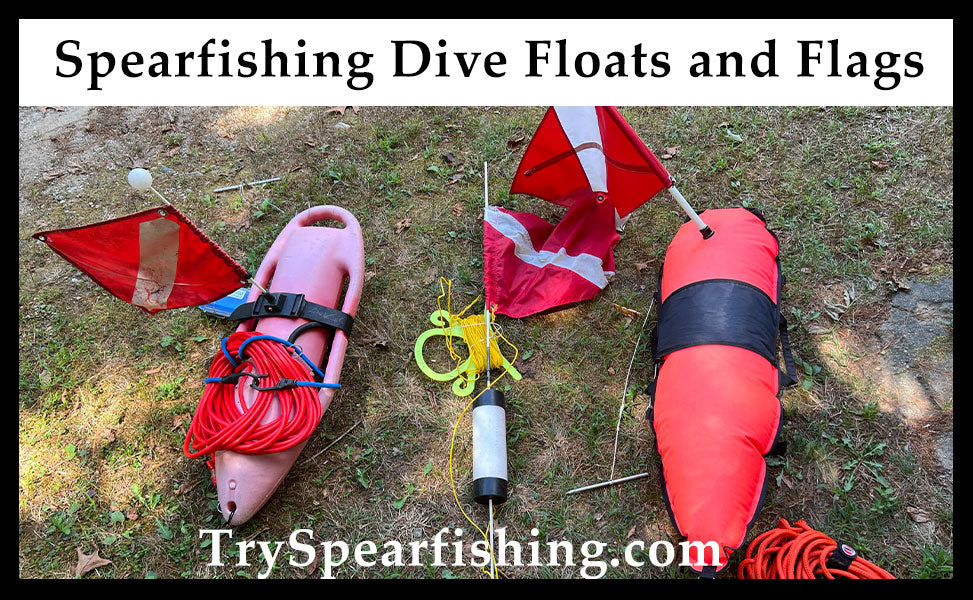
The Best Spearfishing Float Line Setup To Buy or DIY
Depending on what type of freediving you do, a different float may be right for you. My home spearfishing spot is Rhode Island, and I mainly find myself shore diving for Striped Bass and oftentimes spearfishing Tautog too, so I likely have a different preference for float line than someone that is always diving off of a boat, or that is shooting fish much bigger than Rhode Island has to offer.
Before we get into it, I will say I have experience in using: Feel free to click on them if you want to skip everything and only read about Soft Floats for example.
- Spearfishing Hard Floats (my Go - To)
- Spearfishing Soft Floats (Best for traveling)
- Cheap Spearfishing Floats (I don’t recommend)
- DIY Spearfishing Floats (I seem to always modify my dive floats to best suit my needs for each dive)
- Different Spearfishing Float Line Setups
Okay let’s dive into it.
Spearfishing Hard Floats

Above you can see my go to float set up, Rob Allen Snapper Railgun 800 that I find myself using most often.
This is what my float looks like when I am walking to the water or walking back from the water. It took me years to find the most efficient way to carry my float, and keep my float line tangle free. Let’s break down my go to float set up, and then I will talk about each other type of float I own and occasionally use.
My float is a Mako Hawaiian Hard Shell Spearfishing Float. The picture below shows what the float looks like after 5 years of heavy use.
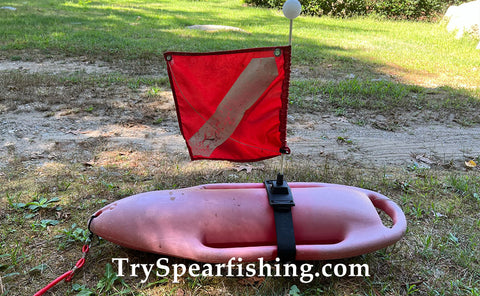
It’s a simple concept, but the float works great, the hard shell lets you pull it up and across rocks and it never has an issue. The buoy is perfect for holding onto if you need a break or in case of an emergency, you have something reliable to hold and float.
Under the buoy there is a 2LB weight which keeps it oriented in the surf, you need one if you don’t want your flag flipping over on you.
When I bought this float I purchased a rubber float line along with it. Rubber float line certainly has its disadvantages, but overall it’s the most convenient line I have used.
Over the years it has seen some wear and tear so I have had to repair small gashes along the line. It takes about 5 minutes and is good as new. The thing I like the most about the rubber float line is that it doesn’t get tangled. If you have another type of float line or use rope, it’s likely when you are rolling it up, it will get tangled and be a pain. This rubber rolls up in seconds and is good to go.
Shore diving in Rhode Island means I am never going deeper than 40’, because of this I use 50’ of float line.
Okay now let’s get into the accessories that I attach to my float.The first accessory I ever added was of course a fish stringer. Check out the image below.

The stringer is the work of my father. An easy DIY fish stringer that works perfectly. It's a stainless steel cable, maybe 2 feet long. It is attached to a stainless steel bar. We now use stainless steel but I know we used aluminum and didn’t have any issues. The key is to get a metal that won’t rust.
The cable and the metal bar were both bought at home depot. We did have to drill a hole in the metal bar to thread the cable through, so you’ll need a drill for that of course. On our other float we don’t use the cable, instead we use a strong dyneema. This works fine, but does need to get replaced every year or so.
I like this type of stringer because it’s straightforward and works great. After I shoot a fish I always brain it, bleed it, gut it, and then put the stringer through its eye sockets. This definitely sounds harsh, but the fish is already dead since I’ve brained it. I started putting the stringer through their eye sockets after losing a fish that I had strung through its gills. There’s just a lot more room in the gills for that metal bar to move around.
The next thing I added was a threaded carabiner. Check out what I mean and I’ll tell you why you should add one too.

While this isn’t the best picture, it does the job showing what I mean. I put the carabiner attached to the rubber strap. This carabiner lets me easily attach anything I need to my float. I like the threaded carabiner because it's made well, and gives me that extra comfort that I am not going to lose anything I attached since I spin it tight. Of course a regular carabiner will likely work, the threaded gives you that extra sense of security, and you aren’t screwed if the carabiner springs give out.
The next picture shows the 2 must haves that we attach to my father’s float.

So the first thing we always bring with us when we are shore diving is an extra band. This can be an old band, it doesn’t matter. We use an old band that I cut and added a metal wishbone to. The reason is because we often swim for an hour or 2 in one direction, and the few times we have had a band break mid session, it’s a pain and a session ruiner if you don’t have an extra. Just this year my father had a session where 2 of his new bands broke. Luckily we both had an extra so he replaced the bands in the water and didn’t skip a beat.
The next thing only my father uses on his float, but it’s useful for most people shorediving in my opinion.

Along with an extra speargun band my father (who has double vision) has a waterproof glasses case. This is a game changer for him, since in Rhode Island you often have to walk on a lot of rocks to get to where you enter the water. Without this case he has to leave his glasses in the truck which makes the walks 10x worse.
The other use case for this is to bring your car keys with you. While I do recommend taking out the electrical part of your key fob and only bringing the physical metal key, it’s a game changer not having to hide your key under your car’s tire like I did for years.
I also brought this case in a kayak for kayak dives, and put my sunglasses and car keys in it while I was diving. It kept them both dry and safe for the whole time.
Anyone that wears glasses or needs to ring their keys with them I highly recommend this case, it’s a Pelican 1030 Micro Case Series. I honestly don’t know where we got it (likely Amazon) but it’s been a game changer for my father. Plus it still doesn’t leak after years of use.
Lastly, I attach a bungee cord to the float, this has a few benefits. One of which you can see in the image below.

The number 1 reason I pack a bungee cord on my float is for the float line. For years I would wind up the float line and stuff it into the side handles of the float only for it to unravel and make a mess and cause a nuisance while walking the piers in Rhode Island.
This year I added the bungee cords and simply wrapped them around the float line and they don’t move an inch during the walks.
I also tuck the extra speargun band under them so it’s not loose in the water. Another benefit is if I ever see some garbage while I’m freediving, I can tuck it under the bungee cord until I reach the truck or a trash can.
Spearfishing Soft Floats
So, if you decided you want a soft float you probably chose it for its ability to be packed down small and make it easy to travel with.
If that’s the case I think a soft float is right for you.I purchased these two soft dive flags and float set ups in April when I was getting ready for a month long spearfishing trip in the Florida Keys. Instead of bringing my dive gear on the plane, I used UPS and shipped them to the house I rented for the month. Soft floats saved me a ton on shipping costs.
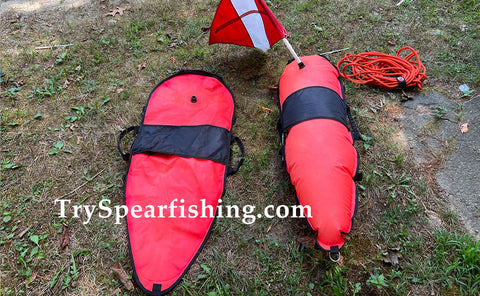
Above you can see the two floats I purchased, one is inflated obviously and the other is deflated.
Being able to pack them up tiny in my shipping boxes was a major plus.
The floats came with the flag, and the option to add 60’ of float line. Unlike the float line I use on my hard dive float, this line is made from a plastic rope. It seems strong, and durable. But it is a pain to wind up since it's always getting kinked up. It only takes a minute or so to untangle, but for that reason alone I prefer my rubber tubing float line. One nice thing about the float line is they have a nice, velcro strap that keeps the rope bundled together. This is actually what gave me the idea for the bungee cord.
Just like my hard float I added a fish stringer to my soft floats. I also added a weight to the bottom of the float to keep it centered and not tipping over in the surf. I don’t add a bungee or anything for fear of popping the float. I am sure I could use the attached speargun traps, but it seems too flimsy to work well. If these were my everyday float we would of course attach the glasses case and the spare speargun band.
The soft float is slightly larger than my hard shell when it’s inflated, but essentially the same size. It’s off-brand that I got from the spearfishing world. Although I like the float I have some sort of issue every single time I have ever shopped with them. Everytime I shop with them I get an email 3 days after ordering letting me know they don’t have what I ordered in stock.
The sole reason I prefer a hard shell over a soft float is because I am afraid of popping my soft floats. The rocks and the walks through paths to the water always make me nervous.
The hard shells are problem free, so unless you are traveling, get one. The last type of dive flag I have experience with is what I would call:
Cheap Spearfishing Floats
When I began spearfishing I always used cheap floats, oftentimes DIY floats made out of boogie boards. I later came to learn their annoyance and lack of float assistance made them more of a liability than an asset.

You can see from above this is less of a float than it is a flag attached to a line. I used this type of dive flag for probably 3 years before I bought my hard shell dive float. And let me tell you, I only regret not getting the hard shell sooner.
Luckily, since I now have 2 hard shells and 2 soft shells, I never have to use my cheap dive flags even if I bring other people.
The float line isn’t anything more than medium thickness rope, and it doesn’t even have a tuna clip.
I know getting a float like this is cheaper, and it might not seem like a bad choice, but I am begging you, don’t get a cheap float like this. Get a float that can provide buoyancy for yourself while you’re out there and get a float line that actually floats, and attaches to your gun.
Lastly, regardless of what type of float you have, if you are shore diving and going after fish that aren’t over 40 pounds, I highly recommend attaching your gun to the float line.

As you can see from the picture above my Rob Allen Snapper has a Tuna Clip on the handle. This perfectly clips into the end of my float line which lets me let go of my gun in the water and have no worry of losing my gun. Or, if I shoot a big fish I can let go and just grab the float line or the float while the fish pulls the line.
I have this type of set up for every gun and float I own. Even my Rob Allen Aluminium Tuna Railgun that has a reel on it.
Final Thoughts on Dive Flags and Floats
Regardless of what type of float you have or plan on getting, it’s important to turn your float into an asset while you are diving. Think of creative ways and DYI’s to get everything you need while you’re diving.
It’s crazy to me thinking it took 4 years to think of bringing a bungee cord or a spare speargun band out with me. Same goes for my fathers glasses case.
When it comes to spearfishing, thinking through and planning your dives ALWAYS makes it go smoother. It’s the times you show up unprepared that mistakes happen.